
- AUD/JPY was seen near the 94.30 zone on Friday ahead of the Asian session, retreating toward the lower end of its daily range.
- Despite mixed signals from oscillators, moving averages tilt the broader technical bias to the downside.
- Support lies near 94.00 and 93.88, while resistance is seen just above 94.40; indicators remain conflicted with bearish lean.
The AUD/JPY pair extended its decline on Friday, hovering near the 94.30 zone after the European session and slipping closer to the lower end of its intraday range. The pair is down notably on the day, reflecting an increase in selling interest. While some momentum indicators remain neutral or even slightly constructive, broader technical signals continue to favor a bearish bias for the near term.
Looking at the indicators, the Relative Strength Index (RSI) fell below 50, yet neutral in tone, while the MACD posts a slight buy signal , hinting at possible short-term correction. However, the Bull Bear Power stands at 0.641, reinforcing the underlying selling pressure, and the Williams Percent Range remains neutral, failing to offer a clear reversal signal.
Moving averages present a split picture. The short-term 20-day Simple Moving Average (SMA) at 94.02 continues to signal a buy, offering dynamic support. However, the 10-day EMA (94.45) and SMA (94.58), along with the 100-day (96.85) and 200-day (98.70) SMAs, all lean bearish, suggesting that upside potential remains capped unless a structural shift occurs.
In terms of levels, immediate support emerges at 94.16, followed by 94.02 and 93.88. On the flip side, resistance is seen around 94.35, 94.42, and 94.45—just ahead of key short-term moving averages that could act as selling zones if bulls attempt to regain control.
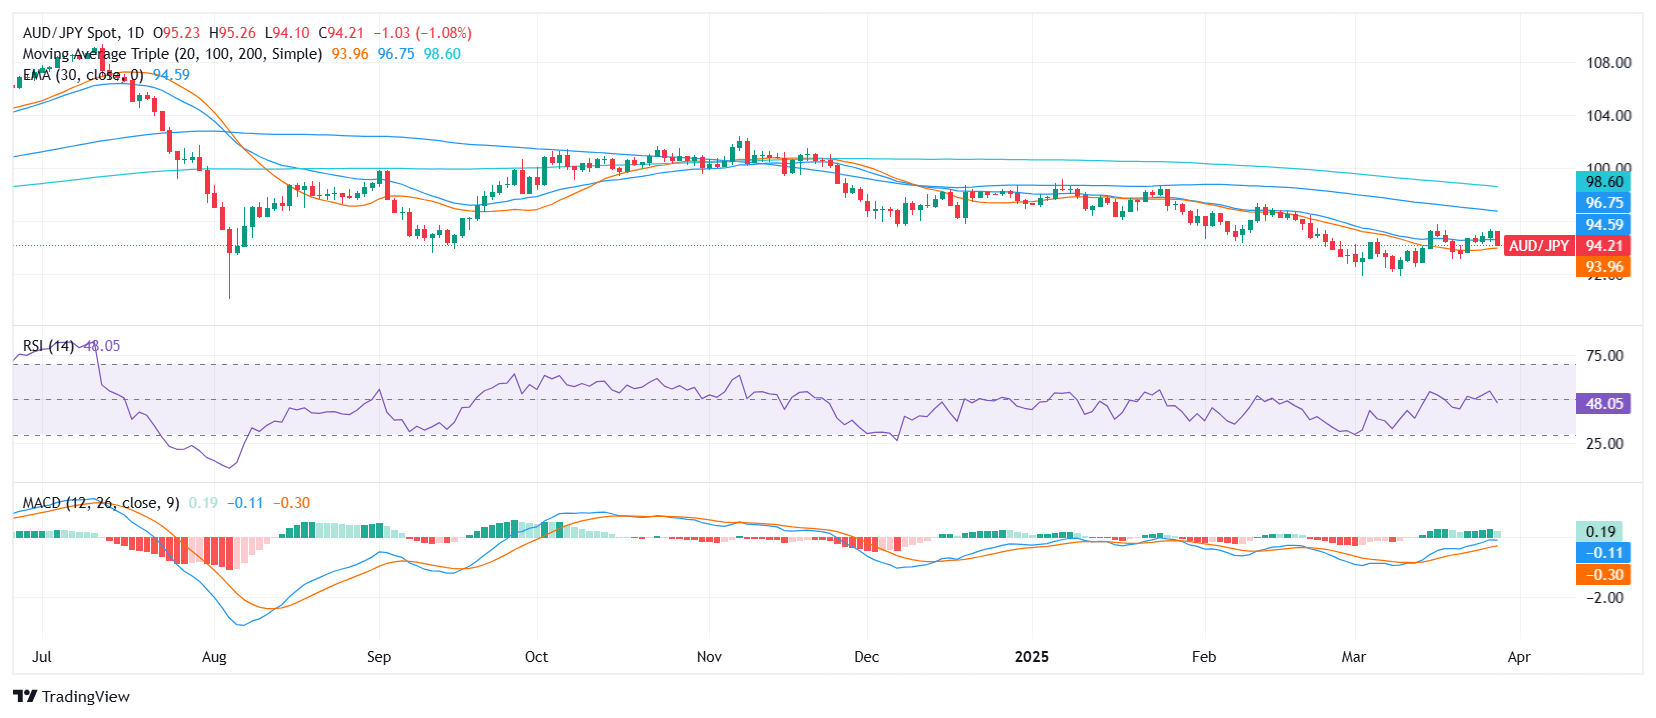
AUD/JPY daily chart
Information on these pages contains forward-looking statements that involve risks and uncertainties. Markets and instruments profiled on this page are for informational purposes only and should not in any way come across as a recommendation to buy or sell in these assets. You should do your own thorough research before making any investment decisions. FXStreet does not in any way guarantee that this information is free from mistakes, errors, or material misstatements. It also does not guarantee that this information is of a timely nature. Investing in Open Markets involves a great deal of risk, including the loss of all or a portion of your investment, as well as emotional distress. All risks, losses and costs associated with investing, including total loss of principal, are your responsibility. The views and opinions expressed in this article are those of the authors and do not necessarily reflect the official policy or position of FXStreet nor its advertisers. The author will not be held responsible for information that is found at the end of links posted on this page.
If not otherwise explicitly mentioned in the body of the article, at the time of writing, the author has no position in any stock mentioned in this article and no business relationship with any company mentioned. The author has not received compensation for writing this article, other than from FXStreet.
FXStreet and the author do not provide personalized recommendations. The author makes no representations as to the accuracy, completeness, or suitability of this information. FXStreet and the author will not be liable for any errors, omissions or any losses, injuries or damages arising from this information and its display or use. Errors and omissions excepted.
The author and FXStreet are not registered investment advisors and nothing in this article is intended to be investment advice.
