
Nick Lewis is an editor at How-To Geek. He has been using computers for 20 years — tinkering with everything from the UI to the Windows registry to device firmware. Before How-To Geek, he used Python and C++ as a freelance programmer. In college, Nick made extensive use of Fortran while pursuing a physics degree.
Nick’s love of tinkering with computers extends beyond work. He has been running video game servers from home for more than 10 years using Windows, Ubuntu, or Raspberry Pi OS. He also uses Proxmox to self-host a variety of services, including a Jellyfin Media Server, an Airsonic music server, a handful of game servers, NextCloud, and two Windows virtual machines.
He enjoys DIY projects, especially if they involve technology. He regularly repairs and repurposes old computers and hardware for whatever new project is at hand. He has designed crossovers for homemade speakers all the way from the basic design to the PCB.
Nick enjoys the outdoors. When he isn’t working on a computer or DIY project, he is most likely to be found camping, backpacking, or canoeing.
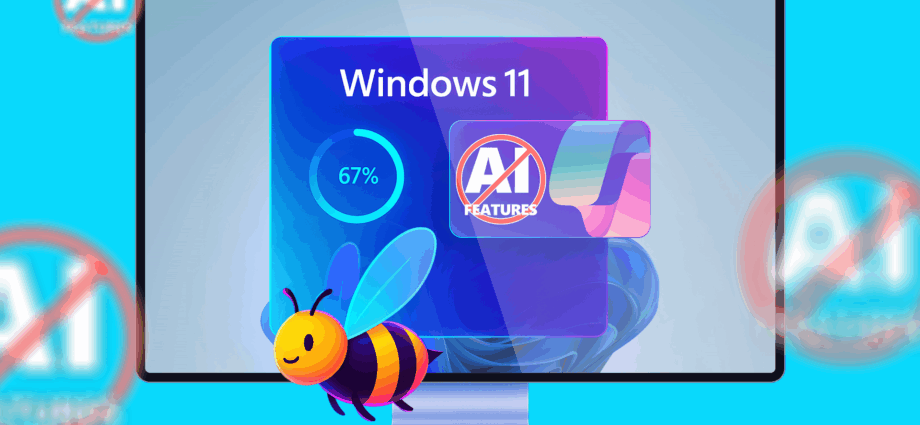
Windows 10 has reached end of life, which means Microsoft has backed off support for the operating system unless you opt in to get extended service updates. If you’ve recently switched to Windows 11 and find some of the changes annoying, here are a some ways to quickly fix a few of them.
Windows 11 introduced a mess of visual changes, and not all of them have been popular. Among the least popular is the new right-click menu, which trades the classic Windows right-click menu for one that is “nicer” looking but generally less useful.
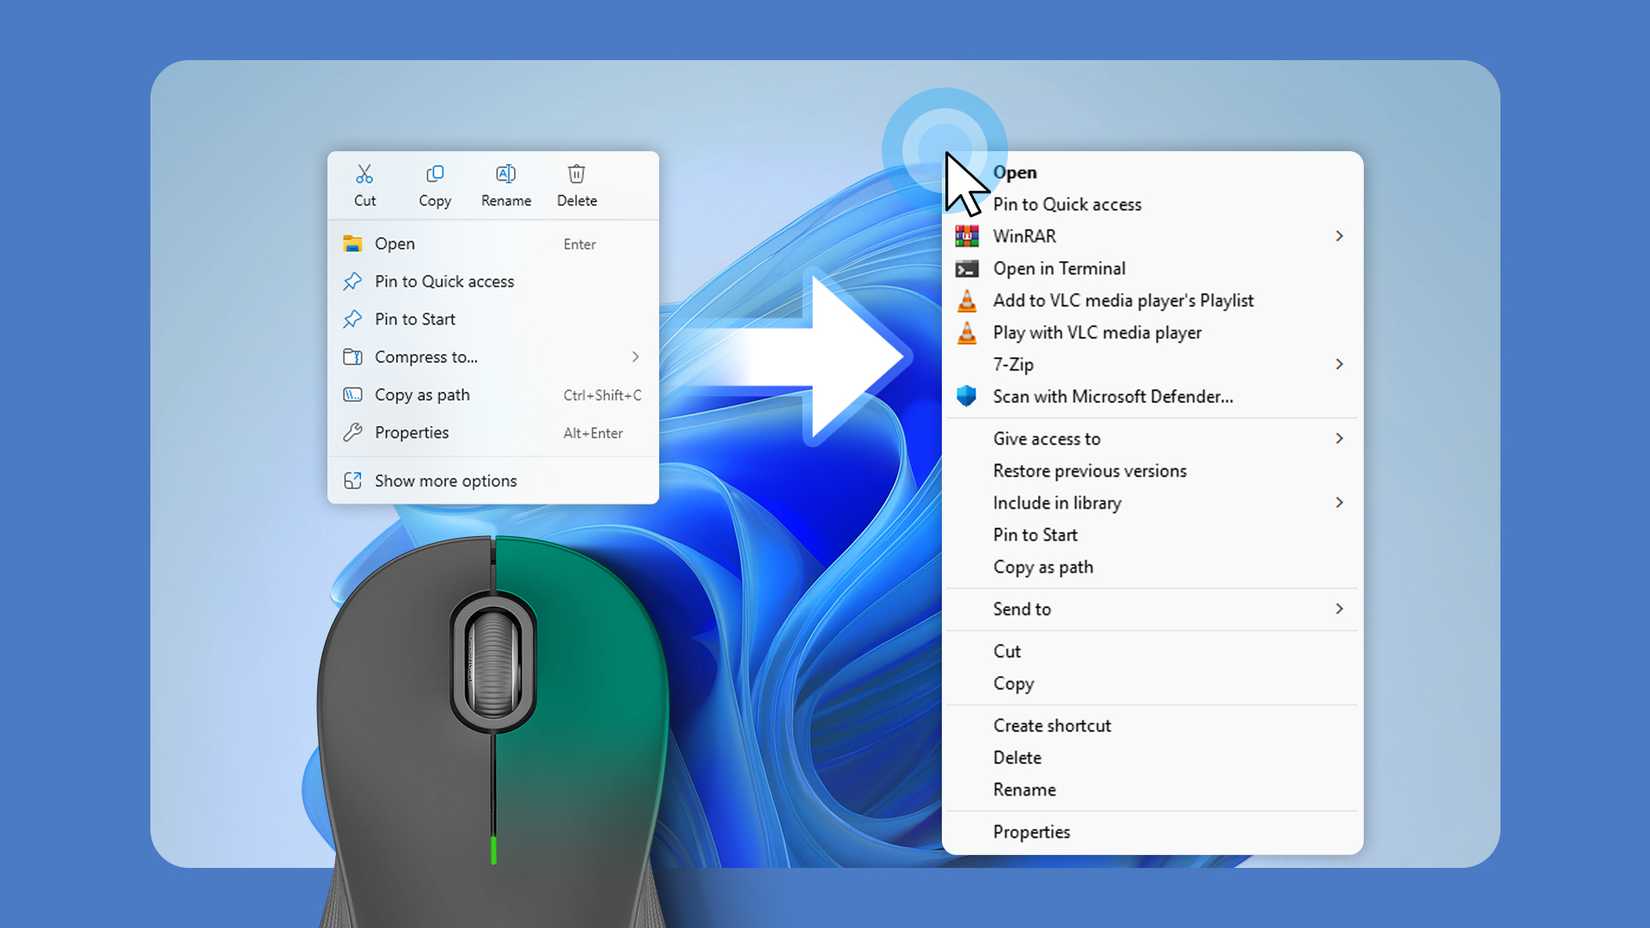
You can always Shift+Right-click to open the extended (old) context menu, but why press an extra button if you don’t need to?
To restore the original right-click context menu, we need to use a registry tweak.
Editing the registry can cause issues if something goes wrong. You should consider making a backup first, just in case.
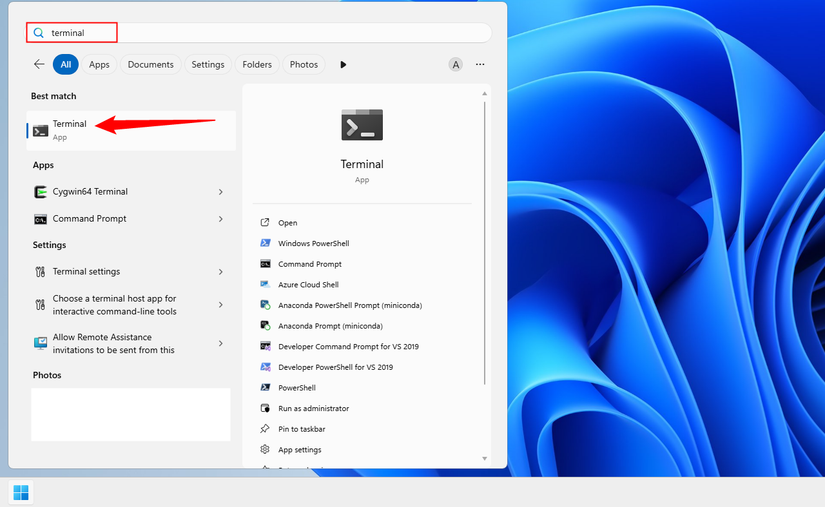
Begin by opening up Terminal. Click the Start button, search terminal, then click on the first result. You can open Terminal as an administrator if you want, but it isn’t necessary for this to work.
Now, copy and paste the following command into the Terminal, then hit enter:
reg add "HKCUSoftwareClassesCLSID{86ca1aa0-34aa-4e8b-a509-50c905bae2a2}InprocServer32" /f
If everything went correctly, you’ll see “The operation completed successfully” in the Terminal window.

The change will take effect the next time you restart File Explorer. You can restart your PC to do that, or you can manually restart Explorer from the Terminal, since you’re already there.
Copy and paste the following command into the Terminal, then press Enter.
taskkill /f /im explorer.exe; start explorer.exe

You’ll see your screen briefly flash as File Explorer restarts, then you’ll have the full right-click menu every time you right-click.
Microsoft also changed the layout of the Start Menu when they designed Windows 11. In many ways, it feels less useful than the basic Start Menu design we’ve had since Windows XP. It uses up a ton of space and manages to display very little.
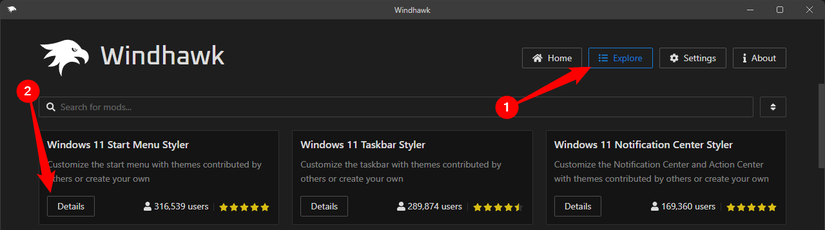
To make it more useful, I use a program called Windhawk, which offers a huge number of customizations.
Warning: Like many such projects, these customizations are community-made. WindHawk hasn’t had any noteworthy problems with malicious customizations, but it is theoretically possible.
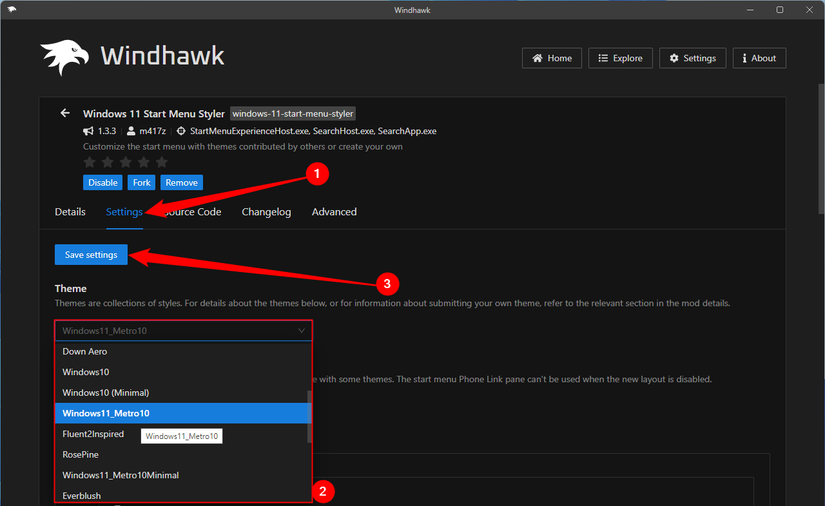
First, download and install Windhawk from the Windhawk website. Click the “Explore” tab in the upper right, then click “Details” on the Windows 11 Start Menu Styler card. If it isn’t there, just search start menu styler and it’ll show up.
Click “Install” at the top, select “Accept Risk and Install,” then wait for everything to finish downloading.
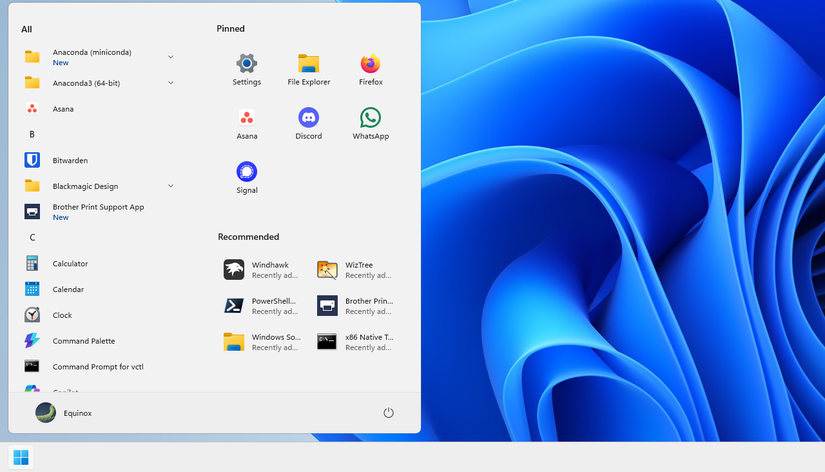
Once that finishes, click “Settings,” select the theme you want from the drop-down menu, and click “Save Settings.” I chose Windows11_Metro10 because it retains the general aesthetic of Windows 11 but arranges things like they were on Windows 10.
The next time you open the Start Menu, you’ll see the new theme you selected.
I don’t use desktop icons, so the primary way I interact with my PC is through the Command Palette or Start Menu. However, there is literally never a time when I want to use the Start Menu to search Bing. Luckily, you can get rid of it with only one command.
Open the Start menu, search for terminal, then click “Run as Administrator.”

Then, copy and paste the following command into the Terminal:
reg add HKEY_CURRENT_USERSoftwareMicrosoftWindowsCurrentVersionSearch /v BingSearchEnabled /t REG_DWORD /d 0
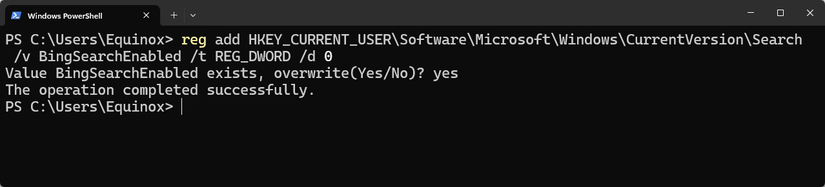
If everything goes correctly, you’ll see the message “The operation completed successfully,” and you’ll stop being pestered by Bing every time you search for something using the Start Menu.
Get Rid of Copilot
Copilot has been crammed into everything from simple apps like Notepad and Paint to the Microsoft Office suite, regardless of whether you want it or not.
You’ll also find that a separate Copilot app is automatically installed after some major updates to Windows 11.
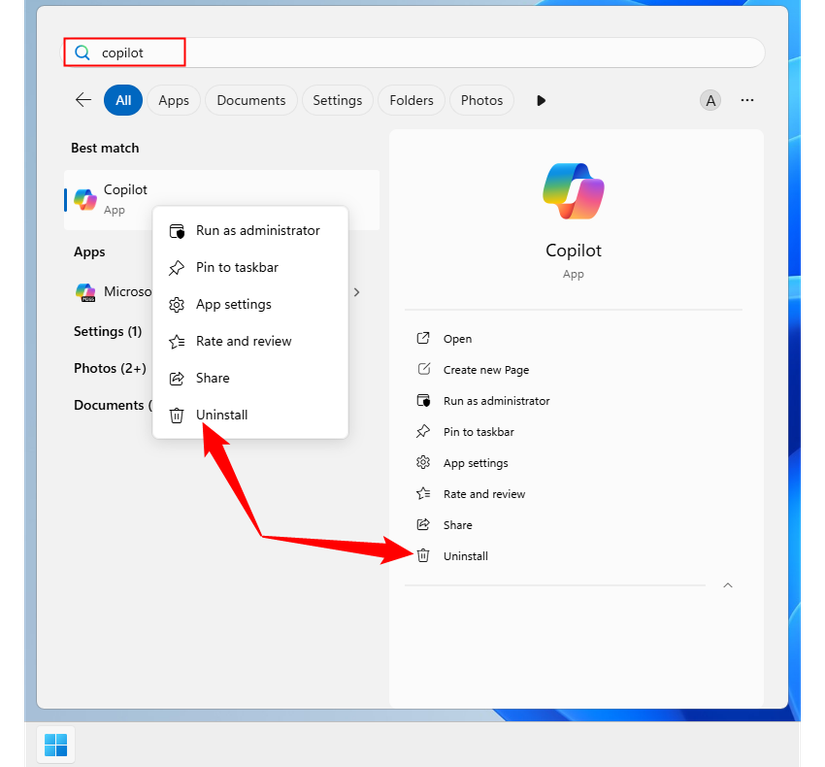
When I use AI, I prefer to use one I’m locally hosting, so I remove Copilot from my PC completely. To do so, search for copilot in the Windows start menu, then right-click the result and hit “Uninstall.”
Just keep an eye out—it’ll probably be back after a major version update.
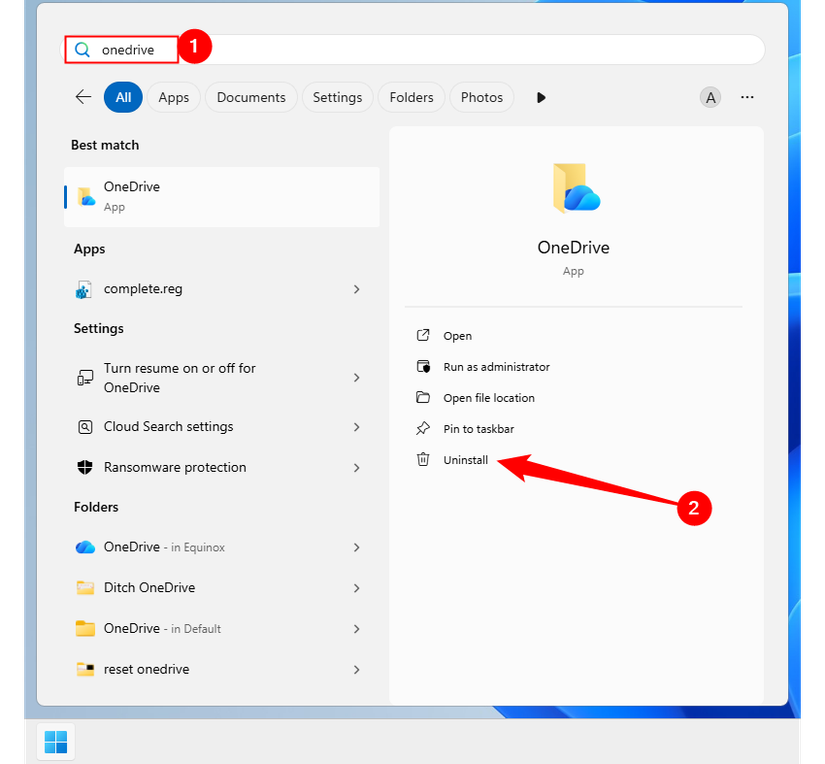
Get Rid of OneDrive
OneDrive is Microsoft’s cloud service, and it comes pretty deeply integrated into Windows 11. Not only is it pesty, it is also buggy (or at least unintuitive) and can sometimes accidentally delete your files. As a result, I’ve swapped it out in favor of a more privacy-focused alternative.
To prevent myself from accidentally saving something to OneDrive, I just remove it completely.
Be sure you make copies of every important file you want to keep before removing OneDrive, just to be sure nothing goes wrong.
To uninstall OneDrive, open the Start Menu and search OneDrive. Then select “Uninstall” to the right, or right-click OneDrive and select “Uninstall.”
Once it is uninstalled, you’ll likely find at least one folder has been removed from Windows Explorer.
It is hard to argue with the perks of having a cloud storage solution on your PC though. If nothing else, it makes backing up certain essentials so convenient that I’m much more likely to do it than I would be otherwise
.
I’ve been using Proton for a while now without any major hiccups. It even integrates into File Explorer like OneDrive does—without the buggy file syncronization.
